Slab Leveling Router Jig / Planing Sled

I’ve got a ton of oak slabs from a tree I milled, and I need a good jig to flatten them. I recalled reading a Fine Woodworking article where Nick Offerman made a jig, and I decided to do something similar. There are a ton of these things floating around the internet, so I also did some searching to find out what other people are doing. Infinity Cutting Tools has good article on making the jig, and I see some on YouTube and Instructables. Some of these jigs have some flaws, and I want to point them out so you don’t replicate their mistakes.
Check out the video of me making the jig:
Sketchup / Plans
I based my jig off of Nick Offerman’s design presented in Fine Woodworking’s Dec 2011 Issue No 222. Download the plans for it as a SketchUp file:
Or download the screenshots below:
I made the plans *after* I made the jig, which is sort of backwards but I just wanted to have them on the site for other people to check out. The details in the magazine article were a little sparse since they are dependent on your router setup. Mine are sized for the large 12”x12” Infinity Router Base.
Materials
- 3/4” Birch Plywood (or similar) – Home Depot or Lowes
- 3/4” malamine – Home Depot or Lowes
- Infinity Tools Mega Dado & Router Bit (2”)
- Infinity Tools Router Bit Extension
- Infinity Tools 12”x12” Base Plate
- OR ALL THREE in ONE PACKAGE: 3-Pc Planer’s Package for Routers
- Pocket hole screws for soft wood (course thread)
- Roughly 2” long bolts, nuts (or wing nuts), and washers – x4
- Pronged t-nuts x4
Tools
- Porter-Cable 895PK Router w/Plunge Base
- Kreg Pocket Hole System
- Table Saw SawStop!
- Circular Saw (for cutting plywood to size)
- Electric Drill/Screwdrivers
Construction Notes
The video covers most the construction, which is super easy with pocket hole screws.
I did a blind cut in the bottom to make the slot for the router bit; you could simply rout it out.

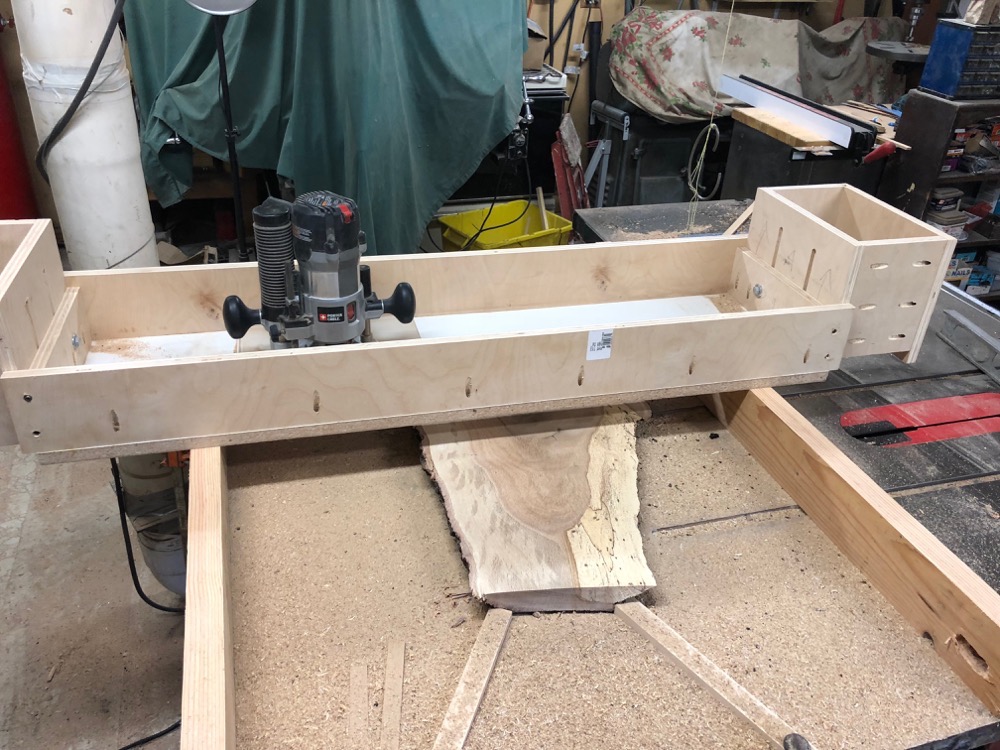
You really want the sides of the box to be on top of the malemine base! I’ve seen some other jigs that have the sides go down to the bottom of the jig; this means your bottom piece may not be perfectly flat. If it isn’t flat, your resulting piece won’t be flat! you can see the pocket holes attaching the sides to the bottom in the photo below.

Another tip shown in the video is to clamp down the side really tight when you screw it together, but first make sure the router still easily slides. If it doesn’t slide easily after screwing it on, unscrew it, move the base and try again; this usually worked out well for me to adjust the fit.
For the “square side boxes”, I used my router table and a ?” spiral bit to rout out the slots:

The pronged lock nuts go on the inside of the jig; you then screw in some bolts (from the inside) and this gives you a solid thread to use a nut or wing nut on and snug up the square sides:

Having a square router base is essential. It holds the router more securely in the jig. If you just use the standard round base the router might want to catch and spin around. It requires more strength to keep it straight. With the square base, you can simply push the router around with one hand and not worry about it too much.

Use some paste wax the inside of the jig to allow the router to slide more freely.
You don’t have to make or use the end boxes. You can simply level the side rails and slide the box around on them. I’ve done this for a few simple slabs and touch ups.
Use a plunge base on the router! You can easily control the depth of each pass by moving the depth guide up for the amount you want to take off and then dropping the router bit down until it hits the guide.

This next picture shows one of my techniques for holding down material. I simply snug it in-between some scrap pieces so it doesn’t move around. Nothing holds it down vertically, and I don’t find it needs it. I do shim it so it won’t rock back and forth.

Routing Direction
It is important to note that you should do each pass “against” the blade movement and not with it. This is called conventional cutting. The alternative is climb cutting, which is dangerous; I did a few passes as an experiment and the blade would want to pull into the piece, causing it to cut too fast and too deep. Here is a good article to read on Climb Cut vs Conventional Cut.
Enjoy flattening some slabs!


[…] out the post detailing the router jig, and a video of how I made […]
So what bit are you using
Infinity tools – it is in the materials list.
[…] router slab jig – If you don’t have a large planer or jointer, do […]
I updated this post to include some better screen shots of the plans.
[…] Free Plans & Details: Slab Leveling Router Jig / Planing Sled […]