Plug Bug: Battery Box Design
I did some research on what people have done for battery boxes. The cells need to be contained well so they don’t go flying around in the event of an accident. A few interesting posts I found:
http://www.diyelectriccar.com/forums/showthread.php?p=186991 — some good pictures.
Battery Boxes for the Adventure EV – a 1971 Land Rover, with nice boxes.
I knew I wanted to make my boxes out of steel, similar to Travis’ bug. I wasn’t sure how thick of steel to use, so I asked on diyelectriccar.com with this post. That also was a great way of seeing some other boxes that I hadn’t seen before. I also learned that 1/8″ steel was probably thick enough. I was originally thinking 1/4″ was way too thick, but I was pondering 3/16″. Since others used 1/8″, and said it worked well, I decided to use it. I also settled on 1″x1″ angle iron.
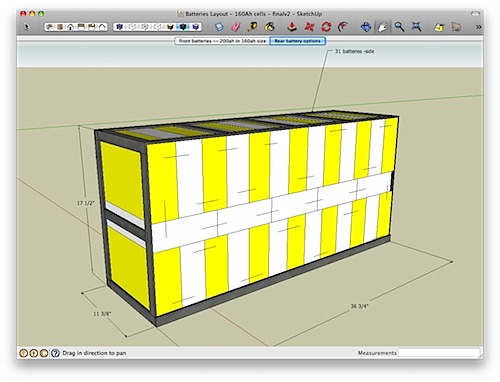
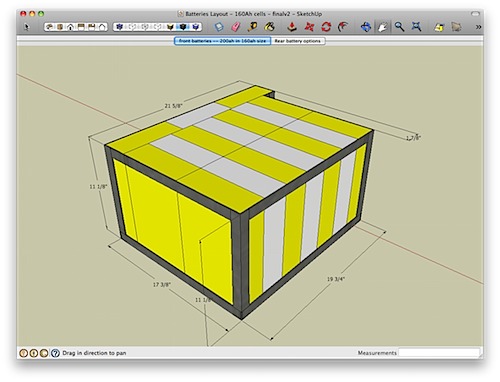
Now, I designed battery boxes months ago for the 160ah size cell. However, my 200ah cells turned out to be bigger, so I had to rethink things. With the 160ah cell, I was going to put a bunch behind the rear seat and the rest in the front trunk. Here is the 160ah battery design sketchup file and some screen shots.
This is the rear pack of 31 cells — it was going to sit quite high, but it wouldn’t obstruct the rear window at all. I was going to secure the cells in the x direction by using the same strapping stuff that I used to secure the cells together. The cells would have been mounted horizontally, which is okay but not ideal. I had emailed Thundersky batteries and they said mounting horizontally is possible, but vertical is better — mainly because if the batteries vent (due to too much heat/expansion), they will vent out the top and spill.
The front pack, 17 cells:
The real 200ah size was quite larger, so I had to rethink things. I finally realized the car was going to be fairly heavy with all these cells (a post on that is coming soon), so I decided to just nix the rear seat. I rarely have a second passenger, and I even more rarely have 3 or 4 passengers in my current car. More often than not, I use the rear area of the Prius to carry unicycles. I decided that I could nix the rear seat and cover it with Lexan and toss the unicycles on top of the batteries. It should work out great!
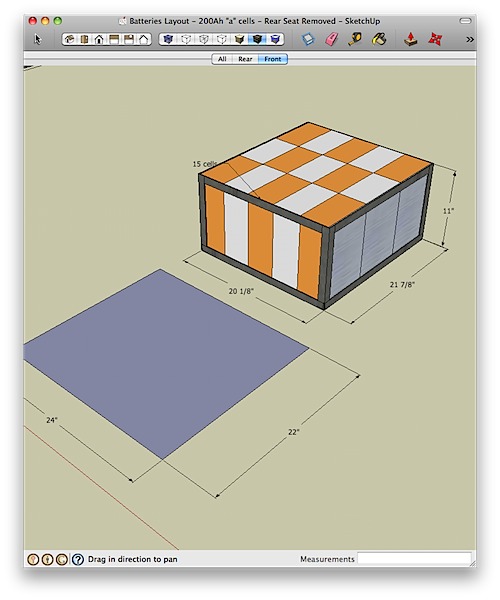
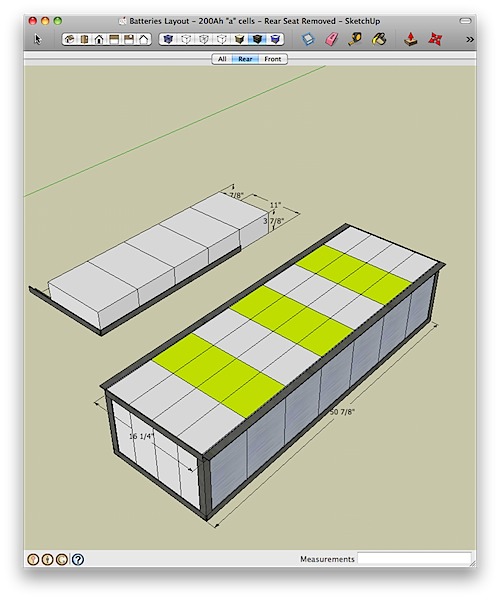
So, here’s the 200ah size design I’m working on fabricating. Note that I leave off some details, like side braces that I (might) add later depending on how strong it feels.
The front pack, 15 cells (each cell is 16 pounds, so that’s 240 pounds in the front trunk area — much heavier than the gas tank normally would have been):
The blue area above is roughly the available floor area that I could use to put the cells.
The rear pack (33 cells), which will sit where the rear seat was, along with a small set of horizontal cells sitting on the rear luggage area. The entire area should be about level, and will all be covered with a few big pieces of thick Lexan plastic.
The rear pack has angle iron on the top pieces to create a flat area to mount the lexan onto, and also possibly some strapping mechanism to strap the cells down. I haven’t decided how I want to secure these cells in the Z axis. The rear cells will be strapped down for sure, but I’m not sure about the front — I might make a latching mechanism for them.
Feel free to download the sketchup files and play around with them. I did a lot of revisions in Sketchup before I came to these designs; mainly playing with layouts, locations, and designs.
Note that the cells have a 1/8″ aluminum plate on the ends — that is used to secure the cells from expansion.


Hey Corbin! This project is super fun to follow. Hope you had a nice Christmas. Where’s the download link for the sketchup files?
I guess I forgot to post it! If you still need it, let me know..